Wherever you look in the bike industry (especially the sections related to drop bars), one of the most commonly used buzz words is ‘aero’. The aerodynamic (or lack of) properties of a bike, component, accessory, or rider can have drastic effects on the experiences of riding a bike over any distance. The benefits of an aerodynamically optimised setup make sense for road racing or time trials but for bikepacking? Many of us are beginning to become aware that anything that makes our life easier when riding or racing long distances is ‘a good thing’. Francis Cade made an excellent video about aero considerations, complete with wind tunnel testing a couple of years ago – in fact, we wrote a blog feature about this.
But now the king of bikepacking equipment deep dives and reviews, Torsten Frank, has gone one better and has just published his findings after testing the aerodynamic properties of not just one bikepacking setup but eight very different setups. As with anything Torsten does, it reads as one of the most thorough research articles. If you have an hour free, then head over to his website to read the whole thing (you will need to translate it if German is not your chosen language). For those of you who just want the results, then keep reading. We’ve synthesised the data down into a shorter TLDR (Too Long, Didn’t Read) version, so you get the take-homes.
The testing process
So with any type of testing, the first step is to define the variables and test protocol. With aero testing, this is particularly challenging due to the huge number of variables. Torsten being Torsten has actually written another extensive “pre-blog” delving into the detail of his protocol and highlighting his assumptions and possible errors. You can read this here.
As with any testing, there will always be the potential for inaccuracies so it’s worth mentioning that these tests are not meant as a wholly exhaustive and definitive study.
Torsten carried out all testing over a two-month period around a defined outdoor route earlier this year. To gather data Torsten used two recognised and reliable tools: Robert Chung’s Chung Method of self aero testing (using Golden Cheetah software) and Aerotune’s Aerotest app, which utilises GPS devices and power meters. These two ways of testing are used by professionals such as World Tour teams to produce highly accurate results.
Twenty-eight trials were carried out for the eight different setups in total. Each trial consisted of several test runs, up to 5 per individual setup trial. Resulting in a total of 107 test runs completed. Each test run consisted of the same, repeatable one-kilometre circuit.
Basic Terms
Before we go any further, there are a few specific terms you need to know to get the most out of the data:
CdA – CdA is the coefficient of drag (Cd) multiplied by the area (A) of a moving object. By lowering your CdA, you can attain greater speeds for the same power input. The lower the figure, the ‘better’ the result (more aerodynamic)
aeroPOINTS (aP) – Since the area of a cyclist is minimal (0.5-0.7m2), CdA values would be in the decimal range, making any differences in results sound complex and with minimal changes. aeroPOINTS multiply the results by 100, making the results (and differences) easier to identify. This approach was developed by Aerotune and used in its Aerotest protocol, one of the testing methods used by Torsten.
Crr – Coefficient of rolling resistance. Tyre construction and air pressure are critical factors in defining Crr. For this test, Torsten used four set levels of Crr to determine the results.
The setups
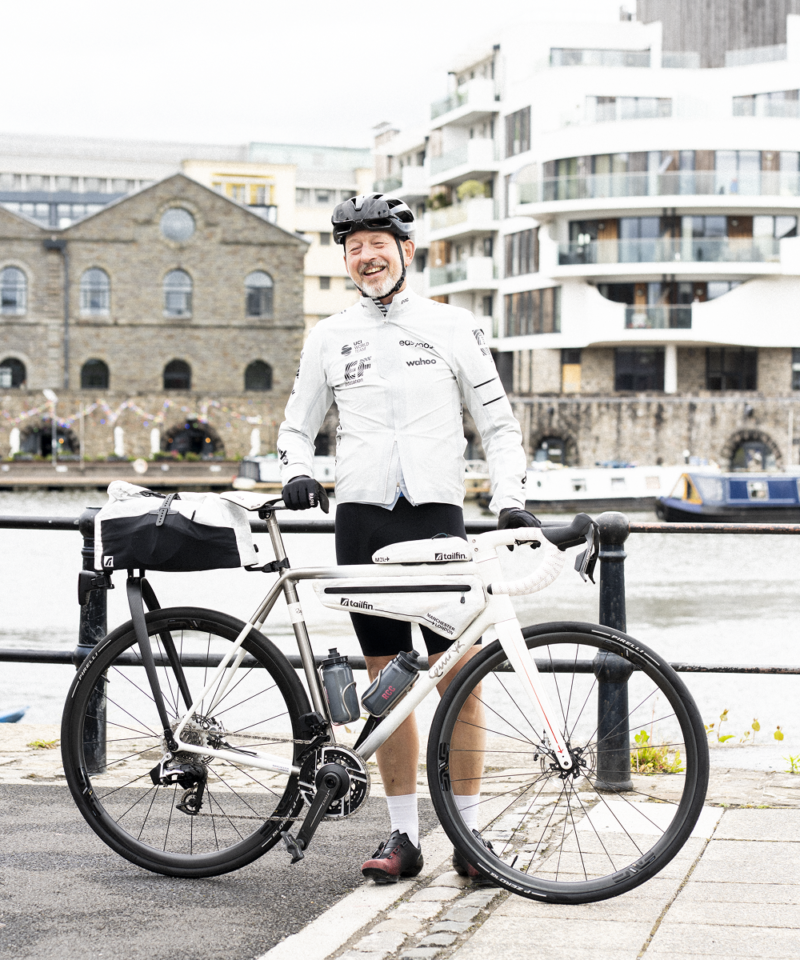
All luggage testing took place on the same bike, Torsten’s No. 22 Bicycles Drifter, a titanium gravel bike. The frame has three bottle cages mounts, with two bottles carried in the frame triangle, a 500 ml on the down tube and 1000 ml on the seat tube. A compact half-frame bag (Cyclite frame bag 01). DT Swiss ERC Spline 47 carbon high-profile wheels, Schwalbe Pro One 700c x 28 front and 30 mm rear road tyres. Standard road type handlebar with Profile Design Aerobars set with 30 mm risers. Torsten also wore the same kit and used the same Kask Protone helmet for consistency.
Torsten tested eight differing setups, including a complete mix of front bags, seatpacks, panniers, and Tailfin AeroPack arrangements as follows:
Setup A-1 – Base bicycle plus Tailfin AeroPack
Setup A-2 – Base Bicycle plus Cyclite handlebar roll and Tailfin AeroPack
Setup A-3 – Base Bicycle plus Cyclite Aero Bar Bag and Tailfin AeroPack
Setup A-4 – Base Bicycle plus Tailfin AeroPack, 2x Tailfin 5L Mini Panniers
Setup A-5 – Base Bicycle plus Tailfin AeroPack, 2x Tailfin 22SL Panniers
Setup A-6 – Base Bicycle plus Tailfin AeroPack, 1x Tailfin 22SL Pannier (fitted on the right)
Setup B-1 – Base Bicycle, no other bags
Setup B-2 – Base Bicycle plus Apidura Expedition (14L) saddle bag.


The results
The following table (figure 1.) outlines the overall CdA results (expressed in aeroPOINTS) for each of the eight test setups. Torsten calculated these against four differing rolling resistance measurements (Crr). He then took the results based around a Crr of 6 as the benchmark figures to compare all setups against each other.
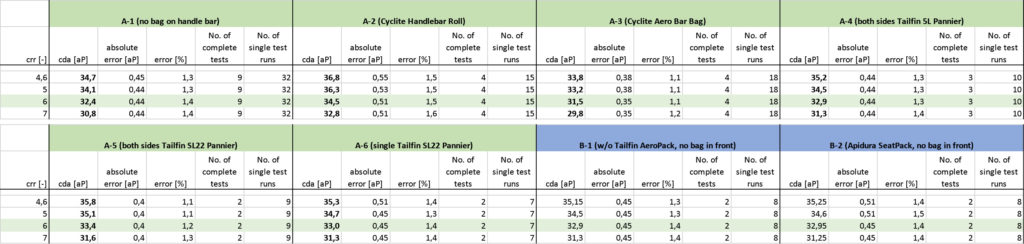
*In aerodynamic tests it is important to know the error variables and accuracy limits. The more even and constant the actual tests are carried out and the more test runs are based on a single test, the lower the remaining sum of deviations between the recorded quantities in the test (power, speed, height gain or loss) with the motion model calculations solved on CdA (and possibly Crr). Error sizes in the amount of 1.1 to 1.5% are extremely good
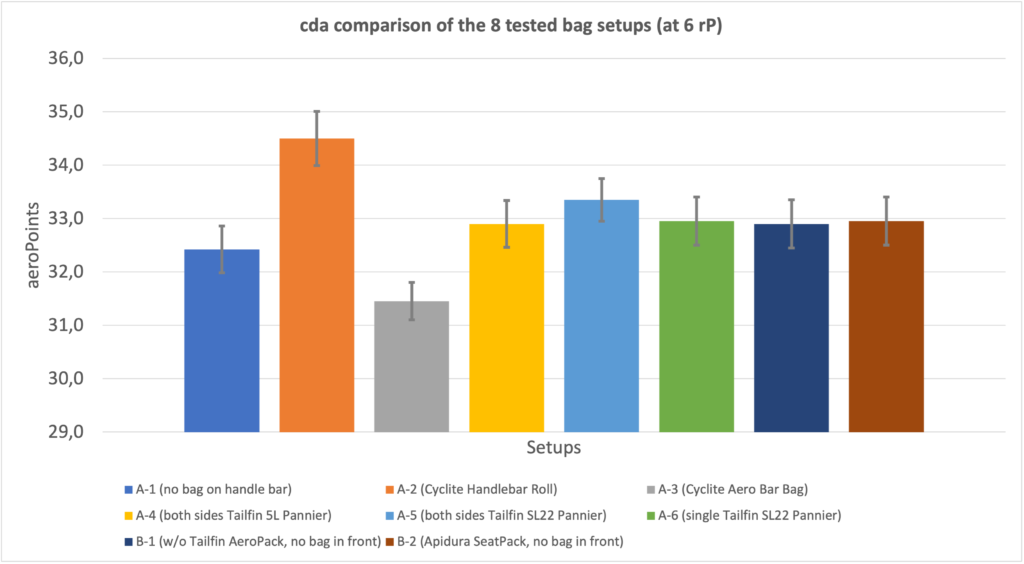
The bar chart above (figure 2.) is the most straightforward depiction of the results. Here you can see that setup A-3 (Cyclite Aero Bar Bag/Tailfin AeroPack) proves to be the most aerodynamically optimised with a CdA (aeroPOINTS) score of 31.5, a full 0.9 points ‘faster’ than the second-fastest setup (A-1). The most exciting result that jumps out of the page is that both setups are faster (have a lower CdA) than the base bike setup with no bags at all.
If you’re still here at this point, you are probably wondering, “all this data is all well and good, but as I don’t have a doctorate in aerodynamics, what do these figures actually mean in the real world?” The simple answer is time; well, to put it more accurately, time saved over a set period.
Torsten’s use of Aerotune’s Aerotest software allowed him to plug in this CdA data, along with several other variables such as system weight (rider and bike), weather and power output; he was able to calculate the time it would take to complete a specific course.
Using the default Challenge Roth course, a 180km long route similar to the distance many ultra-distance riders and racers might look to complete in a day, he extracted some impressive information.
At a set 200 watts, riding at 35 km/h in calm conditions, the difference between the ‘fastest setup (A-3) and ‘slowest’ (A-2) equated to 7 minutes and 31 seconds. So you could save over seven and a half minutes over a 180km course just by swapping from a standard handlebar roll to an aero shaped version. That would be like an extra rest stop for free, every 180km OR the difference between winning and losing.
Conclusions
Torsten’s article goes into far more detail regarding the data collection and results drawn. If you want to really get into it then we recommend you head over to his feature for the whole story. Over here, we’ll leave you with Torsten’s conclusions:
- A Tailfin AeroPack makes you faster! This setup shows a significant 0.5 aeroPOINTs gain compared to riding without an AeroPack (A-1 compared to B-1). Carrying around 14 litres of luggage volume in my case is not only possible without negative aerodynamic influence – no, I even benefit from it!
- By far the slowest option is to use a handlebar roller. Compared to the fastest handlebar bag option, the handlebar roll in the test is even huge 3.1 aeroPOINTs slower.
- A medium-sized seat pack like the tested Apidura Expedition Saddle Pack (14L) is aerodynamically neutral when it sits neatly behind the rider and doesn’t move out to the sides or is wider than the rider.
- Two full-size panniers (tested in the form of the Tailfin SL22 panniers and only in addition to and on the Tailfin AeroPack) is unsurprisingly the slowest of the pannier bag solutions at the rear. But what is surprising is there is only a 0.9 aeroPOINT disadvantage compared to setup A-1 (just an AeroPack). The increase in volume allowed by the use of this size pannier is significant for such a small loss in aerodynamic performance.
- Using two 5L Mini Panniers produces the exact CdA figures as using a single SL22 pannier. And then only represents a 0.5 aeroPOINT disadvantage to riding without any panniers on the AeroPack (Setup A-4 and A-5 to Setup A-1)
- Since the Tailfin AeroPack is 0.5 aeroPOINTs faster than when riding with the Apidura Seatpack or without pannier bags at the rear, the additional use of 2 5L Mini Panniers or a single SL22 pannier produces a neutral result!
In other words, if you want to create the fastest and most aerodynamic bikepacking setup, make sure you start with a Tailfin AeroPack.
To keep up with the latest informative blog posts, be the first to know about new product releases, plus handy features about bike packing and living with your Tailfin system why not join our community and sign up for our regular newsletter?